Many of us have gone through the requirement to have NAV document approval process on customized pages till NAV 2015. In NAV 2016, MS have come up with the new concept called “Events” and “Subscribers” which are involved in Approvals process.
To know more about Events and Subscribing to Events:
In NAV 2016, document approval process is merged with events and subscribers to take the advantage of these two new concepts and complete the approval process. MS have already created most the required Events and Subscribers which are to be involved in the approval process. However, to have the base document approval process on customized pages, we need to create new events and customize approval management code unit and need to setup few parameters.
In this Demo, I choose “Campaign” to have the document approval process using workflow event and available base subscribers. To complete the document approval process, we need to have two workflow events created. One for “Send Approval Request” and other for “Cancel Approval Request”.
This is a sample which I have tried on a particular requirement and this will give you an idea of how we can implement document approvals on customized pages using workflow.
I have created a new code unit 50000/”Demo Events” to handle the new work flow events.
To create the required workflow event, we need to perform the following steps:
- Creating a workflow event code that identifies the workflow event
For Campaign Send Approval Request:
I have created a new function “RunWorkflowOnSendCampaignForApprovalCode” with return type (Code: 128) and which returns the workflow event code.
For Campaign Cancel Approval Request:
I have created a new function “RunWorkflowOnCanelCampaignForApprovalCode” with return type (Code: 128) and which returns the workflow event code.
- Adding the workflow event code to the Workflow Event table.
Created another function "AddEventToLibrary" in the code unit 50000.
In the Properties window of the "AddEventToLibrary" fill the fields as described in the following table.
Property
|
Value
|
Event
|
Subscriber
|
EventPublisherObject
|
Codeunit Workflow Event Handling
|
EventFunction
|
OnAddWorkflowEventsToLibrary
|
After we finish step -2, codeunit should look like this:

- Creating and publishing an event that the workflow event subscribes to
In code unit 1535/ Approvals Mgmt., we have to create the integration events as follows:
For Campaign Send Approval Request:
I have created a new Integration Event “OnSendCampaignForApproval” with respective table(“Campaign” in our case) as the parameter having “Var” checked.
In the Properties window of the “OnSendCampaignForApproval”, fill the fields as described in the following table.
Property
|
Value
|
Event
|
Publisher
|
Event Type
|
Integration
|
For Campaign Cancel Approval Request :
I have created a new Integration Event “OnCancelCampaignApprovalRequest” with respective table(“Campaign” in our case) as the parameter having “Var” checked.
In the Properties window of the “OnCancelCampaignApprovalRequest”, fill the fields as described in the following table.
Property
|
Value
|
Event
|
Publisher
|
Event Type
|
Integration
|
After we finish step -3, 1535/ Approvals Mgmt. will have two new events in it as following :

- Raising the event
To complete this step, there are few standard steps which we need to follow :
we need to have a new option field “Status” on campaign table and two action buttons 1) Send Approval Request 2) Cancel Approval Request on page 5086 and new function “CheckCampaignApprovalsWorkflowEnabled” in codeunit 1535 other necessary code changes in the same codeunit and also in codeunit 1521/Workflow Response Handling
- I have created a new option field 50000/Status having options (Open,Released,Pending Approval) in table 5071/Campaign.
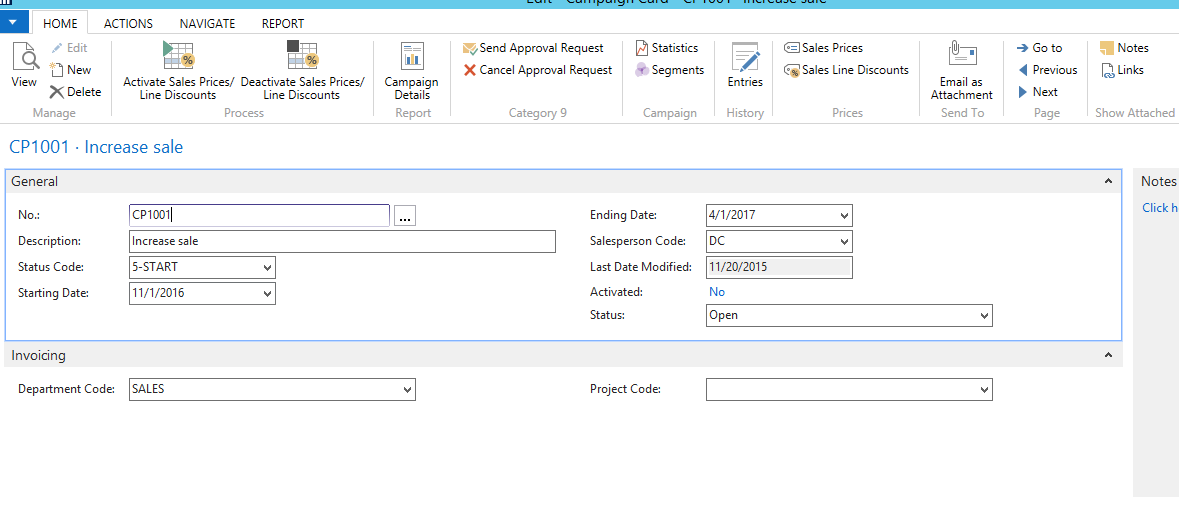
- On Page 5086/Campaign, I have created a new Action Group “Request Approval” with two Action Buttons “Send Approval Request” and “Cancel Approval Request” in it and also promoted set to true. See the following image to see how your page will have these actions.

- In Codeuinit 1535/Approvals Mgmt. :
- Added Global Variables:
Name
|
Datatype
|
Subtype
|
Length
| |
DemoEventHandling
|
Codeunit
|
Demo Events
|
- I have created a new function “CheckCampaignApprovalsWorkflowEnabled” with a parameter “Campaign” having “Var” checked and “Return Type” as “Decimal”. This function will check if the workflow is enabled for campaign approval process or not.

- Added code and local variables in the function “SetStatusToPendingApproval”. See the screen shot below:
Name
|
Datatype
|
Subtype
|
Length
|
Campaign
|
Record
|
Campaign
|

- In Code unit 1521/Workflow Response Handling :
- Added Local Variables in the function “AddResponsePredecessors” and CAL code as show below:
Name
|
Datatype
|
Subtype
|
Length
| |
DemoEventHandling
|
Codeunit
|
Demo Events
|


- Added Local Variables in the function “ReleaseDocument” and CAL code as show below:
Name
|
Datatype
|
Subtype
|
Length
| |
Campaign
|
Record
|
Campaign
|

- Added Local Variables in the function “OpenDocument” and CAL code as show below:
Name
|
DataType
|
Subtype
|
Length
| |
Campaign
|
Record
|
Campaign
|

Now Raising the Event from Action Buttons:
Go to page 5086/Campaign Card, move on to the two action buttons “Send Approval Request” and “Cancel Approval Request”. Add a local variable “ApprovalsMgmt” and code in OnActionTrigger() of both the action buttons. See the table for local variable and screeshot for the code.
Name
|
DataType
|
Subtype
|
Length
| |
ApprovalsMgmt
|
Codeunit
|
Approvals Mgmt.
|

- Subscribing to the event and implement the workflow event
Created two subscriber functions “RunWorkflowOnCancelCampaignApprovalRequest”, “RunWorkflowOnSendCampaignForApproval” in the codeunit 50000 with a paramater “Campaign” having “Var” checked.
In the Properties window of “RunWorkflowOnCancelCampaignApprovalRequest” function, fill the fields as described in the following table.
Property
|
Value
|
Event
|
Subscriber
|
EventPublisherObject
|
Codeunit Approvals Mgmt.
|
EventFunction
|
OnCancelCampaignApprovalRequest
|
In the Properties window of “RunWorkflowOnSendCampaignForApproval” function, fill the fields as described in the following table.
Property
|
Value
|
Event
|
Subscriber
|
EventPublisherObject
|
Codeunit Approvals Mgmt.
|
EventFunction
|
OnSendCampaignForApproval
|
Added Code in both of the above subscriber functions to handle the event. See the screen shot below:

Now we have created the workflow events successfully and need to setup “workflow Event Hierarchies” and “Workflow Event/Response Combinations” and “Workflow Table Relations”.
Setup Workflow Event Hierarchies
Open “Workflow Event Hierarchies” using the search on RTC and you can see a new event “Approval of a Campaign is requested.” in the list. Make sure you select following columns are checked for this new events:
“An Approval Request is approved”, “An Approval Request for a Campaign Document is cancelled”, “An Approval Request is rejected”, “An Approval Request is delegated”
See the screen shot below for reference for how to perform this step:

Setup Workflow Event/ Response Combinations
Open “Workflow Event/Response Combinations” using the search on RTC and you can see the event “Approval of a Campaign is requested.” And “An approval request for a Campaign document is canceled. “ In the list. Make sure you select following columns are checked for the events:
For “Approval of a Campaign is requested.”
“Add record restriction”, “Set document status to Pending Approval”, “Create an approval request for the record using approver type %1 and %2, “Send approval request for the record and create a notification”
For “An approval request for a Campaign document is canceled.”
“Cancel the approval request for the record and create a notification.”, “Remove record restriction.”, “Reopen the document.”, “Show message %1”.
Setup Workflow – Table Relations:
Setup the table relation as show in the screen shot:

Setup Workflow
After completion of the above steps, we need create a workflow and enable it to have the document approvals on campaign page. See the screen shots below and make sure you have the events, conditions and responses as shown below:
Event : Approvals of a campaign is requested and its associated responses :

In this scenario, I have selected the approver type as “Approver” and Approver Limit Type as “Direct Approver” from the response options window for demonstration purpose. See the screen shot below:

Event: An Approval request is approved and its associated responses :

Event: An Approval request is rejected and its associated responses :

Event: An Approval request is approved and its associated responses :

Event: An approval request for a Campaign document is canceled. and its associated responses :

Event: An approval request for a Campaign document is canceled. and its associated responses :

Testing the scenario
To test the above scenario, we need to setup “User Setup” and “Approval User Setup”. To demonstrate i have created two user ID’s “ShivaTeja” and “Navision7Server”.
Setup “User Setup”:

Setup “Approval User Setup”:

Process:
Step 1: I am going to open RTC with “Navision7Server” and will send the approval requests of specific campaign. You can notice the status on that campaign is changed to “Pending Approval”.
Open Campaign Card: (you can see status is open)
I have clicked on “Send Approval Request” which has sent the campain card for approval and chnaged the status to “Pending Approval”.

Step 2: I am going to open RTC with “ShivaTeja” and will open “Requests to Approve” and approved the transaction. You can see the campaign status is released now on that campaign card.

